Showing posts with label Salvation Army. Show all posts

Tuesday, June 3, 2014

Thrift Store Furniture: Before and After

So I may or may not have purchased a mid century dresser at the Salvation Army a little over a year ago and left it in the garage until just recently to collect spiderwebs and dust (much to the chagrin of Shaun). But I did have really big plans for it and I did finally end up baking good on my word and painting it!


I actually planned on purchasing more thrift store pieces over the past few months but Shaun was slightly reluctant (exasperated is more like it) because I hadn't touched the dresser.

Since I got the dresser it spent most of it's life in the garage until one day Shaun got a storage system for the garage and insisted the dresser had to get the boot. We carried it upstairs and put it in the extra "junk" room that we were using as storage for the time being.

Well cue another one of my inspirational cleaning days and said room became my craft room, spare bedroom went into old craft room and the dresser ended up with it. Again it sat for about a month before I finally ended up biting the bullet and painting it. But paint it, I did and I feel so much better now with a functional piece! I still have to give it a light sand and a wax but I've already started on a billion other projects in the house so as soon as I sand the next piece I'll knock this one out at the same time. 

I really wanted to get some Annie Sloan chalk paint to do up this baby but the short trip to Warrenton provided to be just too much for my 10 mile radius of motivation to handle. I also discovered that apparently the stuff is quite expensive as well. This dresser is pretty banged up, not an antique in any sense of the word so I didn't want to waste a ton money if it turned out horribly.  But then, I thought, if I'm already DIYing this, why don't I see if I can DIY the chalk paint as well??

So I took to the inter webs and after a lot of googling, I found a quick, cheap alternative for less than $10. Plaster of Paris mixed with latex paint.

Easy peasy! I got to mixing, adding a little bit of hot water to get the right consistency and voila! I had the perfect, no prep piece painted within a couple hours.


As you can see there are still a few tough spots on the drawer fronts that I will have to touch up. I'm also thinking of getting new drawer pulls. Maybe something cute from Anthropologie?


Bear gets very jealous whenever I am taking pictures of anything other than him. So he likes to sneak in there occasionally to make sure I know he is watching. I think he has perfected his pose.


So there you have it! Bear is enjoying the new dresser in the spare bedroom (which he has claimed as his own) and I'm pretty happy that I finally got it knocked out. Now onto the coffee table! 


Sunday, March 31, 2013

DIY thrift store tray

Spring has arrived! But only in the technical sense of the word. The weather yesterday was bright and sunny and 60. Which, if you're used to a northern climate is not too shabby. Living in Virginia, I was expecting maybe something a bit more...springlike?

Anyways, spring is officially the start of DIY season in my opinion since it's really the time you can open the garage door and sand things down and paint in your driveway without gloves and a parka.

I plan on spending many a weekend refurbishing or creating things for our home in the sunshine and warm blacktop of our driveway.

The funny thing is, from when we moved in until when I got a job was almost 2 months. 2 months of uninterrupted stay at home time to clean and create and refab. The problem, of course, is that I did almost nothing in terms of decorating and DIYing in those first 2 months. Now that I have a job (and less time to be productive) I am ready to get out there and start being creative. It's strange how I always say to myself when I'm working, "if only I had a spare day off I could get so many things done." When in reality when I had so many spare days off in a row I became lazy and comfortable and I didn't want to do anything that didn't include laying on the couch reading blogs. yep.

All that aside, I've finally begun to do my thrift store shopping (but I think that coincides with having an income again) and I'm trying to take things slow but also create items that will have a large impact.

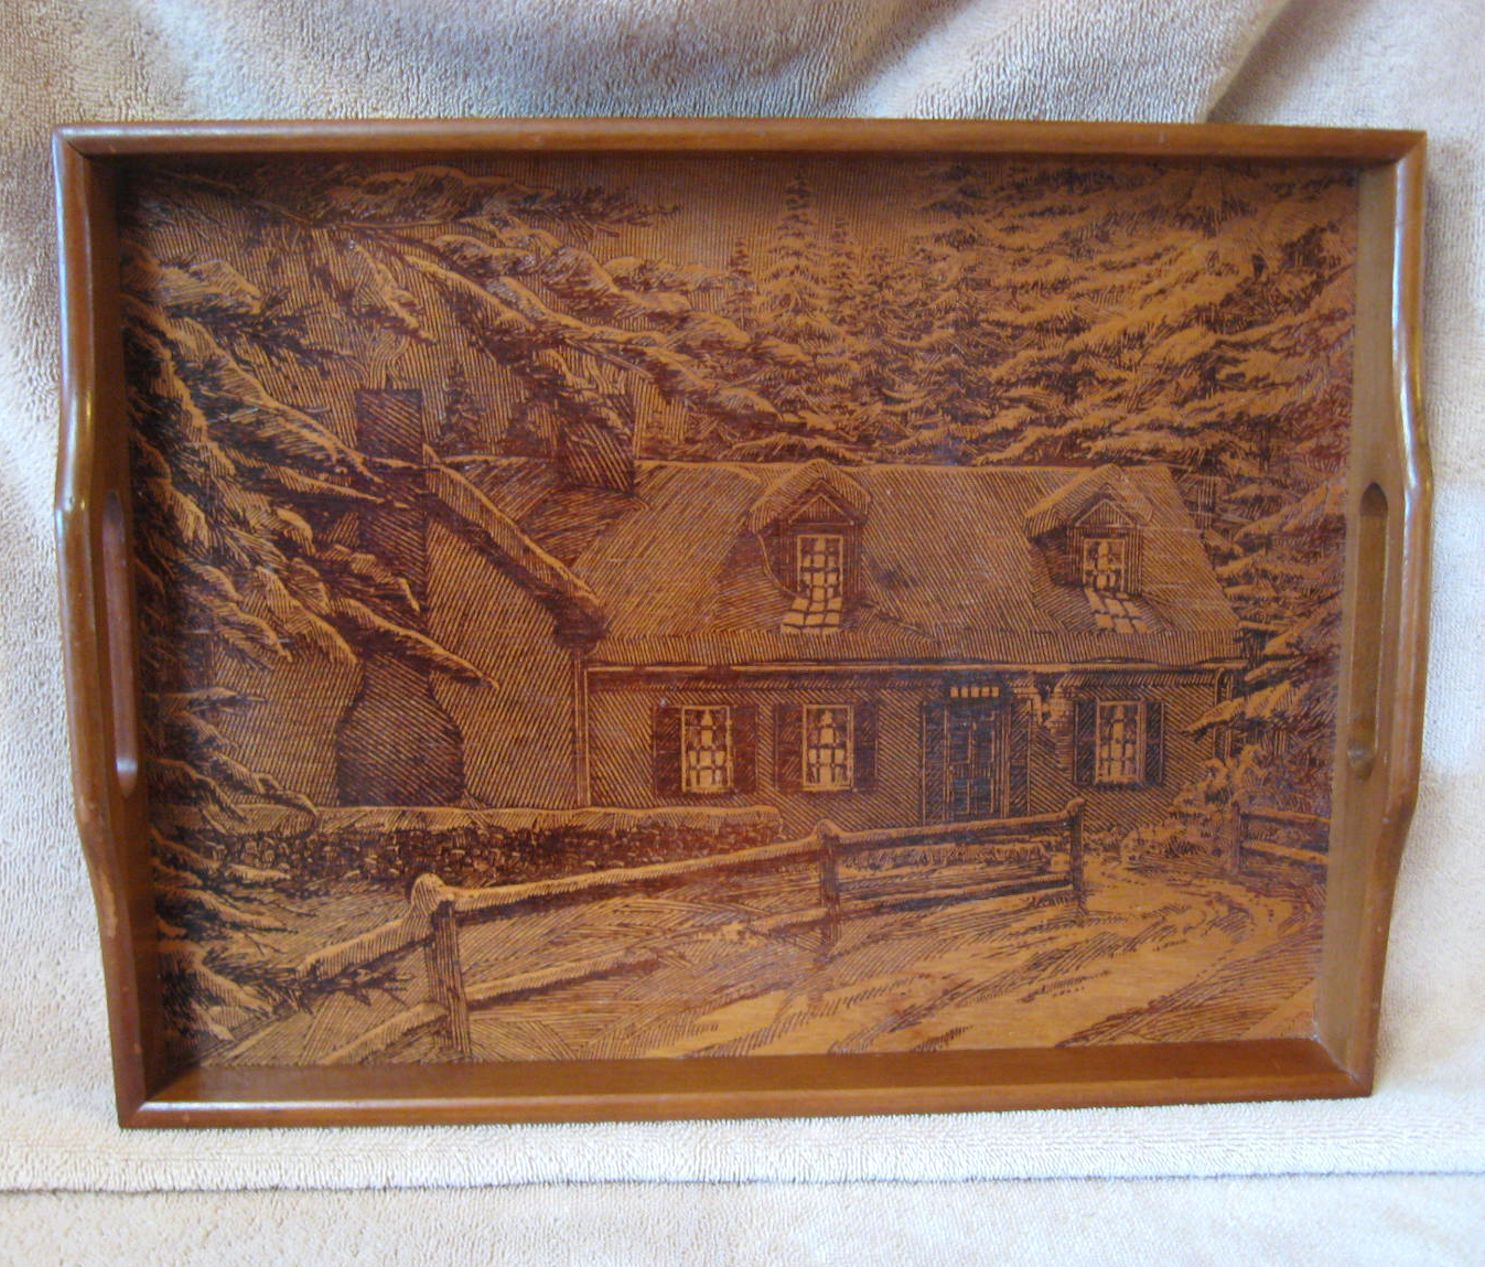
Yesterday, since it was so beautiful and sunny, I stopped into Goodwill and Salvation Army. At Goodwill they had this wooden tray with the picture of a snowy house carved into it. Now as much as I'm sure someone would have loved that tray just the way it was, I didn't and I knew immediately I was going to change it. For $1.96 I made the investment and took it home.

Unfortunately I did not capture any pictures of it myself because I wasn't sure how soon I would be doing anything with it (turns out almost immediately) but I found a picture of it online here


yep. That's it! I've found several of these online being sold for anywhere from $5-$25 so I ended up nabbing it, even in it's original um...snowy condition for pretty cheap.

I wrestled with the idea of leaving the outside portion of the tray wooden and painting the inside a fun color or pattern but I ended up going the quick route and spray painting that bad boy.


Since it was slightly warm outside it took less than an hour to complete 3 coats and have them dry.

I didn't paint the inside pattern because I wanted to mod podge a pattern on top of it. 

I really wanted to use some of the cute wrapping paper I bought from Paper Source but since I downstairs living room/dining room area is taking on a white/grey/red theme I decided to use a red patterned scrapbook paper.

I wanted this to look sort of worn and aged and I decided that if I didn't like it down the line I could always scrape it up and start new.

So I smeared a layer of mod podge on the bottom of the tray and tried to patiently wait for it to become tacky and dry a bit. This is of course at 8:15 when Shaun came home with the truck that we needed to pick up a mid century dresser piece I bought from Goodwill before 9PM (more on that later).

So I impatiently applied the scrapbook paper and tried desperately to smooth out the bubbles that formed in my haste to get it covered.

When I came back I finished the rest by cutting another piece of scrapbook paper to fit perfectly along the pattern of the last one. 

When I sealed it with another coat of mod podge I realized just how bubble it was and tried desperately to smooth it out with not much effect.


Here you can see how bubble it ended up, but I decided I would use it on the shelf to hold books anyway so the bubbles weren't as prominent.


I'm sure I'll end up redoing it in the future or putting it somewhere you can't see the pattern but for now, it was a nice fresh pop of white in an otherwise very industrial feeling table.

For $2 and about a hour worth of work, I'm pretty happy with it.

That's what thrifting has become for me. I used to look at things only in their original state of beauty and it was hard for me to look past the terrible floral pattern or stained wood.

Now I look for shape and practicality and ask myself, can I paint this or refinish it? Can I cover this with something more attractive? And I am realizing that there are even more inexpensive options out there than I realized! 

I plan on doing something fun with the top of our kitchen cabinets soon as well but that will most likely be from objects acquired over a longer period of time. Now that I have determined my color scheme I can finally fill that empty space between the top of the cabinet and the ceiling.